Session Designer Guide
See the whole session
A recording session starts long before anyone presses Record. Microphones need to be chosen, equipment allocated, signal paths worked out and the room set up. For a band recording together, those decisions can stretch across dozens of channels, with each choice affecting what is available elsewhere. Session Designer exists to give engineers and artists more attention for the music, with the technical work organised around them.
Imagine planning the drums first. You choose microphones for the kick, snare, toms, overheads and room, then move on to the guitar and realise the microphone you wanted is already on the snare. Changing that choice affects the preamp, the processing and perhaps another source as well.
These decisions are interconnected. Keeping them in your head, or spread across paper notes and equipment lists, becomes difficult as a session grows. It is harder again when you are preparing away from the studio and cannot simply look across the racks to remind yourself what is available.
Session Designer brings the studio's equipment and connections into a plan you can inspect as a whole. You can consider how the resources fit the session, follow the signal paths and review the supported connection and allocation checks before physical setup begins. The second half of this page walks through each part of the tool.
The engineer still makes the final choices - having the relationships visible makes them easier to work through.
Prepare around the artist's intentions
Planning ahead creates an opportunity to talk about what the artist wants to make. Who needs to play together? Which instruments are important? What equipment might help realise the intended sound? What needs to be ready for the first recording?
Those conversations can inform a practical setup before the day arrives. An engineer can explore the studio gear, consider alternatives and arrive with a clearer understanding of the session's requirements.
Preparation also makes the studio's depth of inventory and connections more accessible. A visiting engineer can get to know the available equipment and connections before working in the room. That helps turn an unfamiliar collection of resources into possibilities they can use.
Protecting momentum during recording
Technical interruptions have a cost beyond the minutes spent fixing them. A band can be building momentum across takes when the engineer has to stop, trace a faulty connection or misbehaving equipment. Everyone is pulled away from what they were listening to, and recovering that momentum takes time and attention.
Session Designer aims to lean into preparation and make the planned setup easier to understand when a question arises. It gives the engineer a reference for the equipment and paths involved, rather than relying entirely on memory or scribbles during setup.
Preparation cannot prevent every fault. Equipment still needs to work, the physical setup needs checking, and unexpected things happen. The benefit is having a clearer plan to work from and fewer avoidable questions competing with the performance.
Leaving room for the session to develop
A prepared setup is a starting point. Once recording begins, the people in the room decide which song to try, whether another take is needed and where the music should go next.
The session can develop with those decisions. A band session might lead to a vocal overdub, a different instrument or a new processing chain. Updating the session design helps keep the intended equipment and connections understandable as the work changes.
Saved sessions also provide a useful reference to reopen later. They retain the planned equipment and connections that have been documented, giving the engineer something to revisit and refine for the next session.
Keep your own way of working
Session Designer is available to support an engineer's methods. You can build a detailed plan, use it for a particular part of the setup, or work independently of it. Visiting engineers are welcome to bring their own approach.
AI assistance is optional too. Engineers can create their own plans and make their decisions independently. The value of a clear session design stands on its own: equipment, connections and setup information that people can understand and use.
For the artist, the benefit is practical. More preparation can happen before recording, more of the setup can be shared, and more of the engineer's attention can stay with the people making the record. That is why Session Designer is part of Future State Studios.
Session Designer, in detail
The headings below describe what the tool can do, from building a plan through to the setup checklist. The interactive tour teaches you how to use it, and each heading ends with a link that opens the tour at the matching chapter. The tool is optional; you can book and work here without ever using it.
What it is
Session Designer allows you to create a plan for recording your project with our exact equipment list. It opens in a browser with nothing to install, anyone can use it from this site, and it is the same tool we use in the studio.
The idea is to plan with our real inventory - microphones, stands, outboard and signal paths - before anyone loads in. That plan becomes a shared setup run sheet for assistants and the band. Four demo sessions are bundled so you can look around. They are read-only, and you can save your own copy of any of them to work on. Start with the band demo, or take the tour from the entry panel.
Try it in the tourTake the tour: Getting started
Building a plan
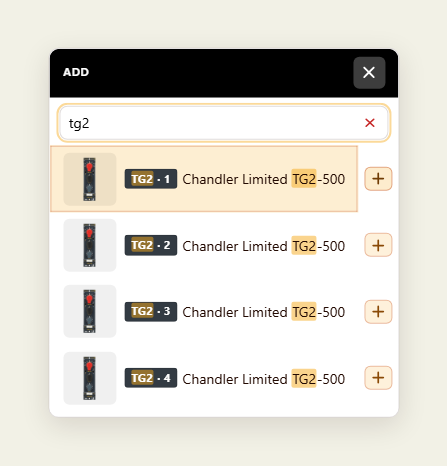
You add gear from a picker that searches our whole inventory and filters it by category, brand and other facets. Searching for part of a name for example - u87 for the U87 AI, tg2 for the Chandler preamps - and units we own multiples of appear as TG2 · 1, TG2 · 2 and so on. A whole signal chain can be added in one go: name MODEL D, TIMELINE and WELLSPRING together and they arrive placed and cabled in that order.
Plans stay editable as the session changes. Any unit can be swapped for another and its cables carry over wherever they still make sense; a card can be duplicated; and the whole plan, or just a selection, can be tidied, aligned, spaced and grouped automatically. Text labels, lines and boxes let you annotate a plan for whoever reads it next.
Try it in the tourTour: Getting startedTour: Build fasterTour: Align and annotate
Reading a gear card
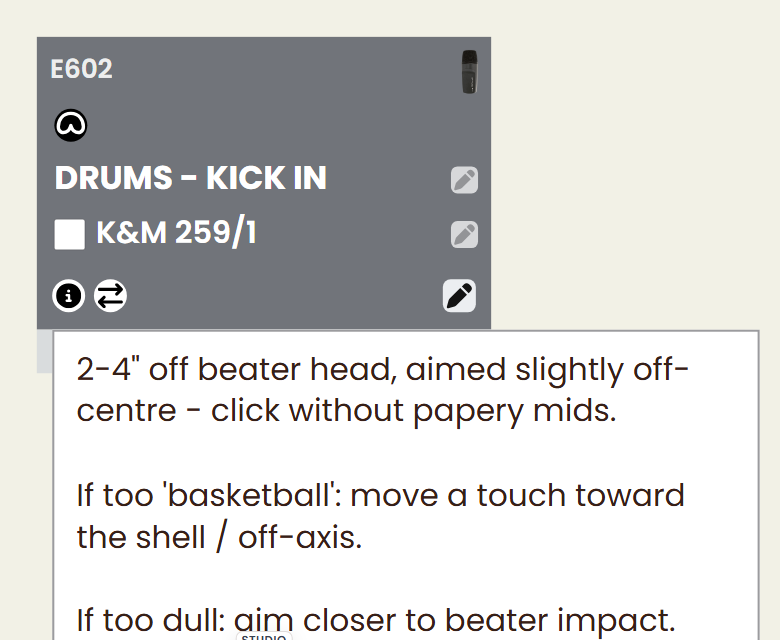
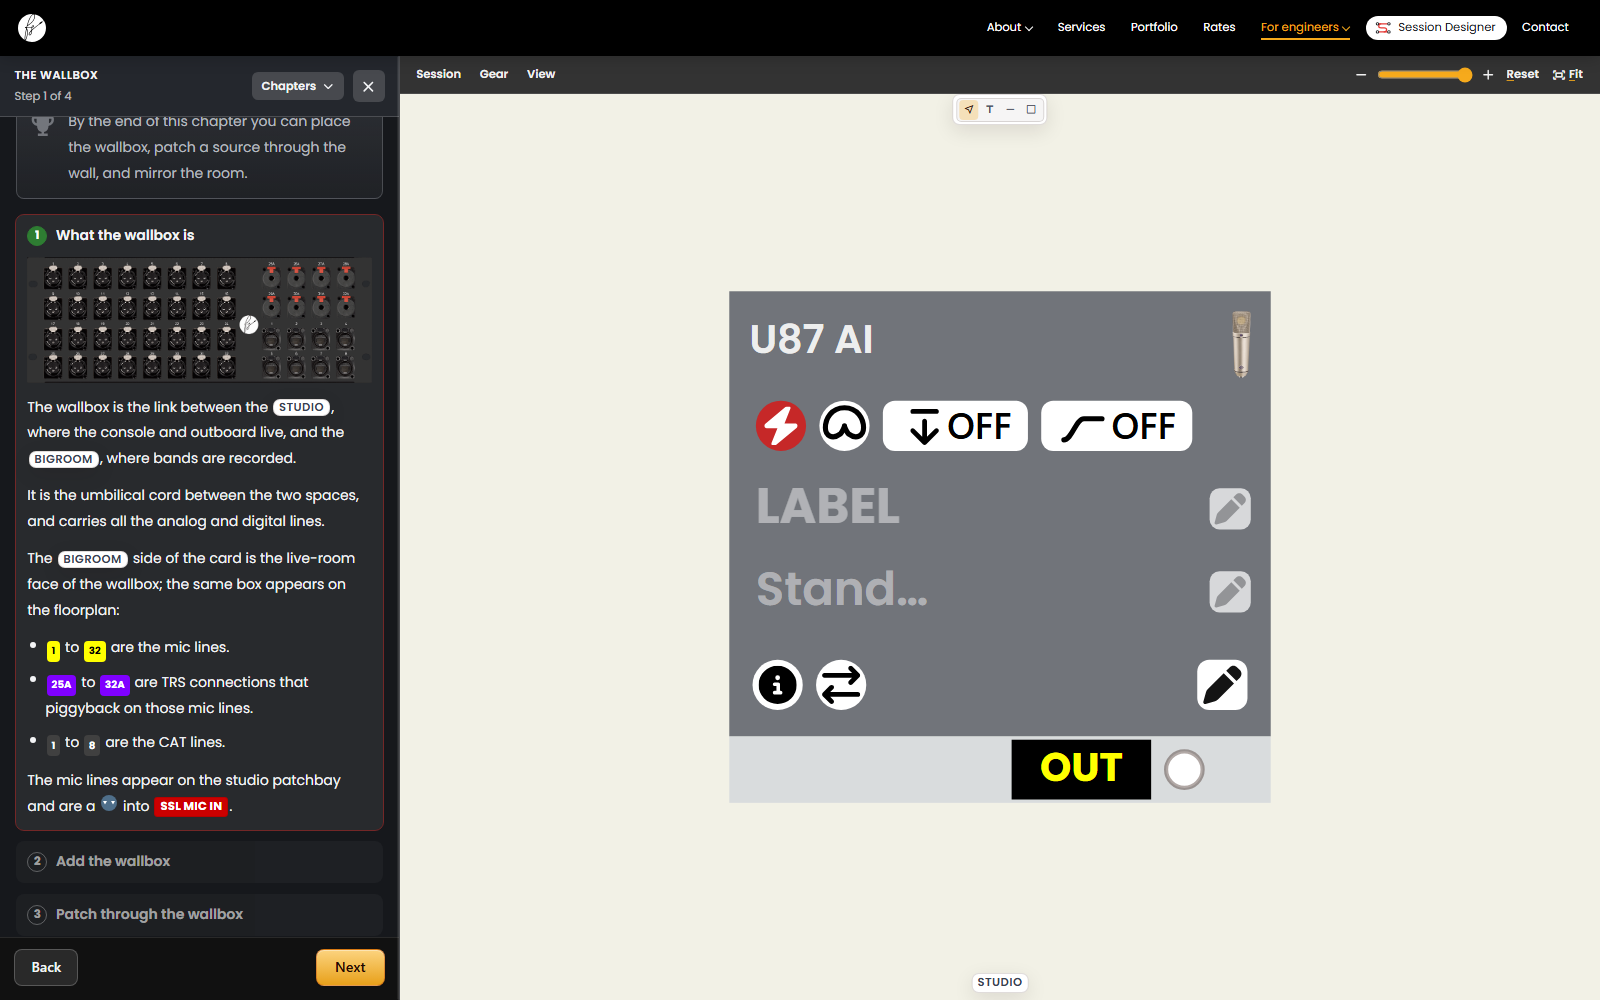
Each card shows the gears's title, photo and its patchbay colour. Inputs sit on the left and outputs on the right, each with its label, jack type, patchbay or trunk point, and a normal marker if we have one wired. A microphone card also carries the capture name (for example "Drums - Kick IN"), the stand it will sit on, chosen from our stands, and its switch settings: 48V, polar pattern, pad and high-pass filter. All of it is saved in the plan and carried onto the setup checklist.
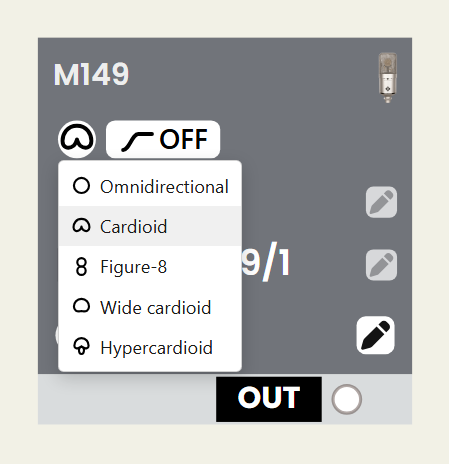
On a multi-pattern mic such as the U87 AI, M149 or OC818 you choose from the patterns that mic actually offers (omnidirectional, cardioid, figure-8, wide cardioid, supercardioid or hypercardioid, as the mic allows). A fixed-pattern mic such as an SM57 simply shows the pattern it has. The chosen pattern, pad and high-pass setting are printed next to the mic on the setup checklist, so whoever places it sets the switches the way you planned.
From a card you can open the unit's details and manual, keep placement notes that travel with the plan, mirror the connection strip to suit the layout, hide the jacks you are not using, see everything feeding a channel in one column, follow the signal upstream or downstream from that point, and open the MIDI panel on units that have one.
Try it in the tourTour: Reading a gear card
Patching and the patchbay
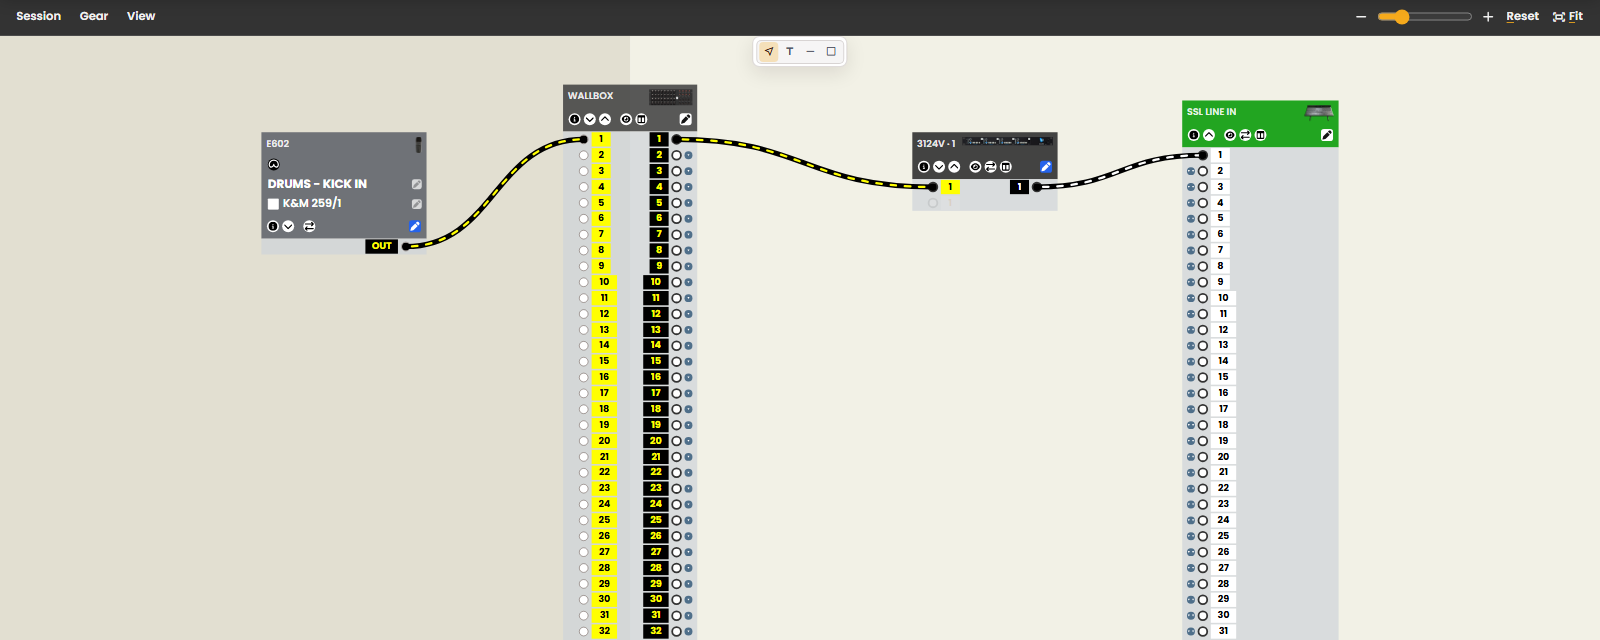
Cables are drawn from card to card, and the tool only lets you make connections that make sense. Jacks that cannot take the connection are greyed out while you work: wrong jack type, output into output, a level mismatch, or a point already in use. Every cable carries the patchbay or wallbox points it uses, and from any cable you can open the patchbay viewer at that exact row.
A legend explains the cable colours - patch cables against trunks and normals - and cables can be animated to show direction. You can find any card by name and isolate one signal run from the rest of the plan, and every change can be undone.
Try it in the tourTour: Cables and the legendTour: Find and follow the signal
The wallbox
Everything that passes between the Studio and the Big Room goes through the Wallbox, and the plan treats it the same way. Add the WALLBOX and the canvas splits into STUDIO and BIGROOM - with a divider between them. The wallbox carries 32 mic/line tie lines and 8 CAT lines.
Each wallbox mic line is normalled through to the matching SSL MIC IN input. Plug a mic into wallbox 1 and it is already sitting on SSL mic input 1 - no patch cable until you break the normal, say by routing through an outboard preamp.
The Studio and Bigroom halves can be mirrored so signal flows the way you read it. A cable that crosses the divider without going through the wallbox is flagged in red, and gear drawn on the wrong side of the wall is listed under To Move in Inventory Use and on the setup checklist.
Try it in the tourTour: The wallbox
The SSL Origin console
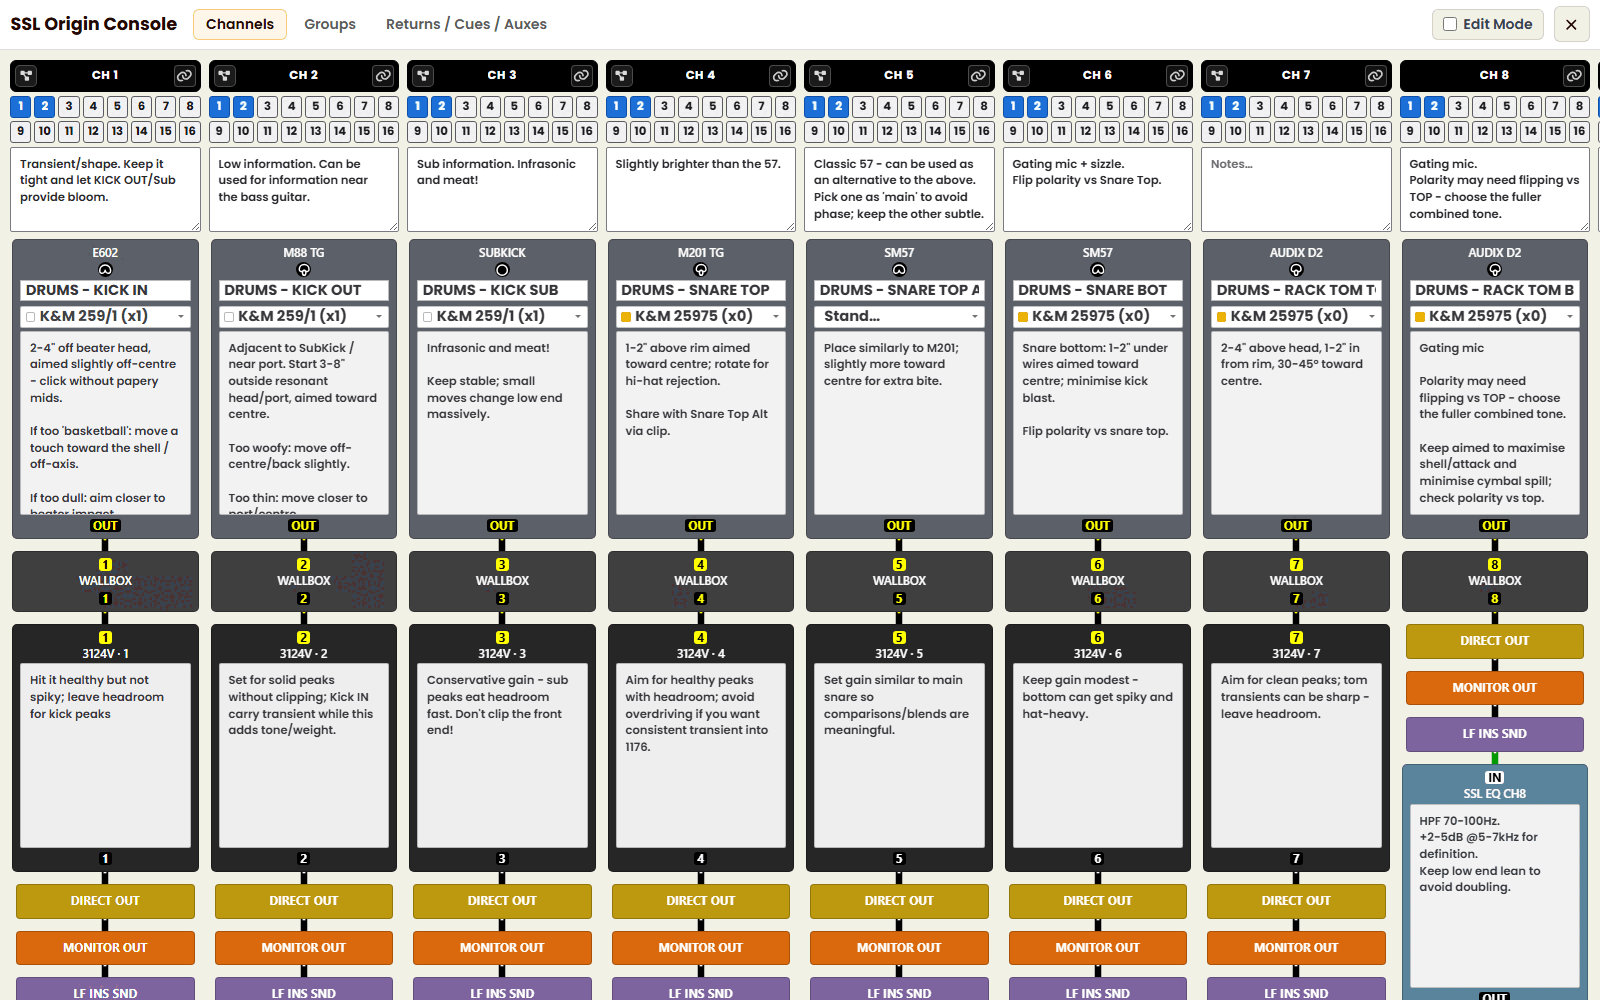
The SSL Origin Console view shows what feeds each channel's MIC and LINE inputs, and what sits in its insert points.
Inserts behave as they do on the desk. Patch the insert send into a compressor and the compressor back into the insert return, and that channel shows the outboard in its chain.
Per-channel notes, mic-input notes, linked stereo pairs and bus assignments are kept with the session and appear under SSL Origin Console on the checklist, with linked pairs shown together ('CH 13 + 14').
Open the console view in the band demo to see a full session laid out.
Try it in the tourTour: The SSL Origin console
The CAT network
CAT runs move network or additional audio between the rooms. A CATBOX can carry four mic/line channels over one CAT cable. All CAT lines are hard-wired to the CAT PATCHBAY in the Studio, where they can be cross-patched as needed into the audio patchbay, DANTE, RTPMIDI or other networks.
For example, a synth in the Studio, say the SUB37, can feed a powered speaker at the far end of the Big Room, or a source out there can come back in on the same kind of line.
Try it in the tourTour: The CAT network
The Big Room floorplan
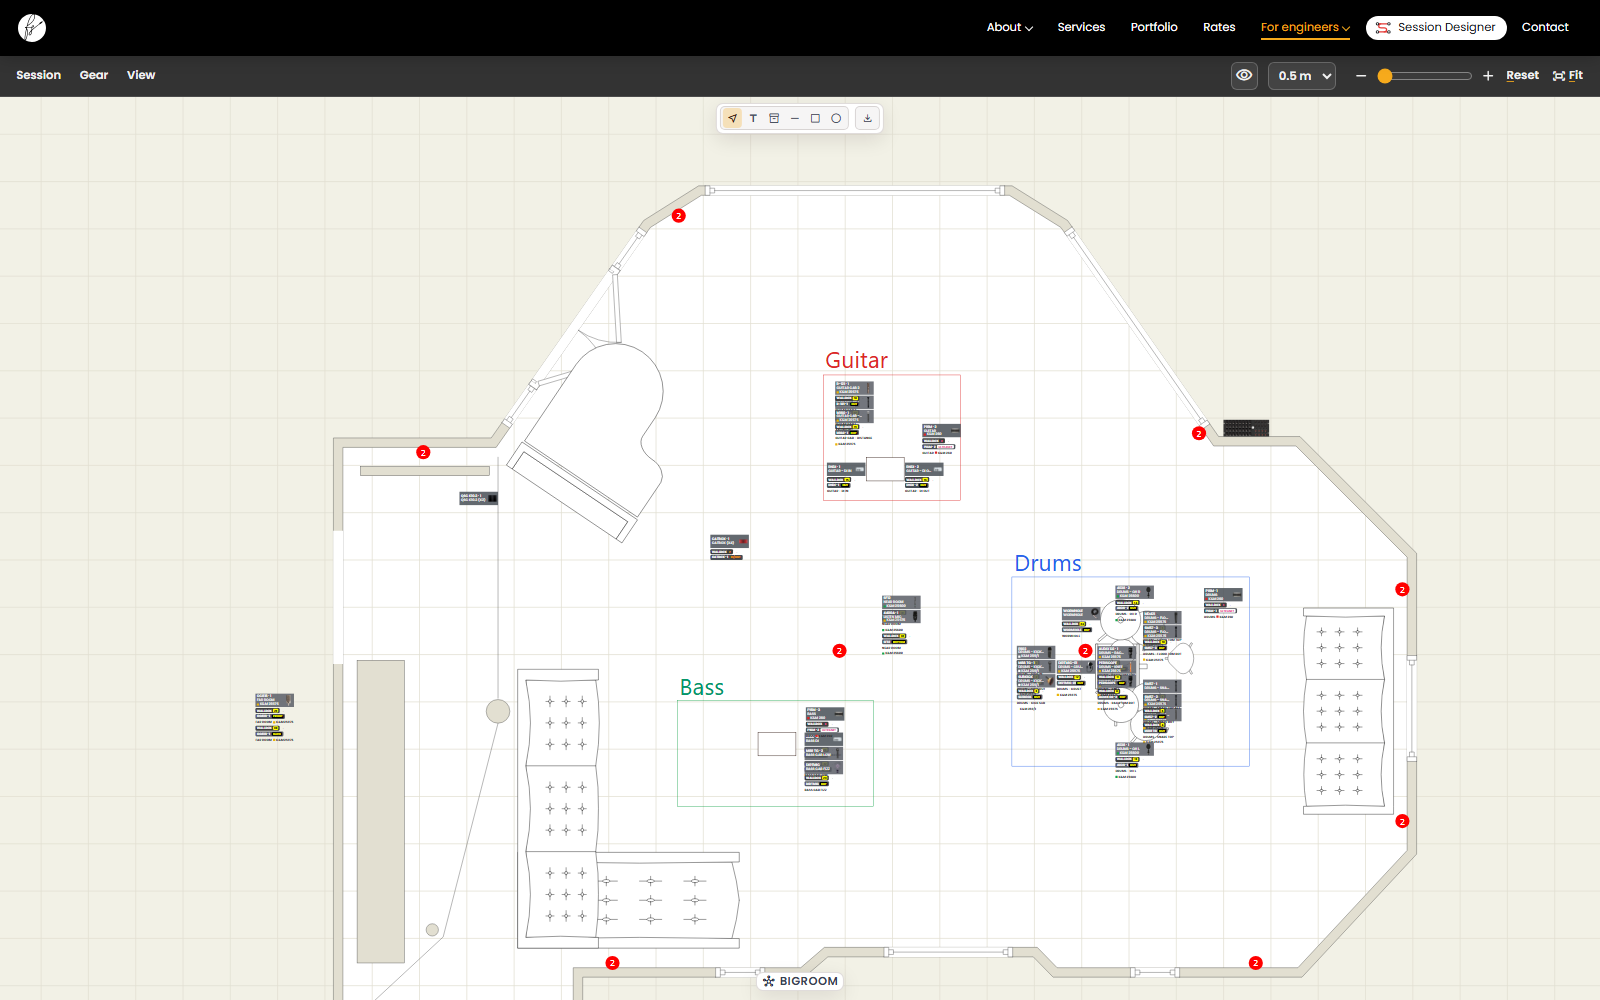
The Bigroom Floorplan is a scale plan of the Big Room, with stamps for the drum kit, grand piano, sofas, and a place for every piece of gear. Placements stay matched to the gear cards - add or delete on either side and the other updates.
The floorplan can be marked up with text, lines, rectangles and circles, and each kind of detail - grid, building, unconditioned power, shapes, text, gear - can be shown or hidden. A picture of the plan can be exported to hand to the band or pin up in the room, and the Plan section of the setup checklist is generated from the same layout.
Open the floorplan in the band demo to see a full band laid out.
Try it in the tourTour: Plan the physical session
Saved chains and your own gear
Your favourite signal chains - a vocal chain, a drum-bus pair - can be saved as a chain with a name and a category, and dropped into the next session from the same picker you add gear from. When you place it, we check whether that gear or those patch points are already in use in the plan and tell you before anything is wired twice. Chains are kept on the computer you made them on, the same as plans. They can be exported and imported as needed.
Musicians often bring their own pedals, interfaces and the odd mystery box. Bring your own gear adds that equipment to the plan with its own inputs and outputs. It belongs to that session only and shows on the floorplan in red until you place it. Sessions and saved chains can be renamed, duplicated, exported and deleted from one library.
Try it in the tourTour: Build fasterTour: Bring your own gear
Session Setup
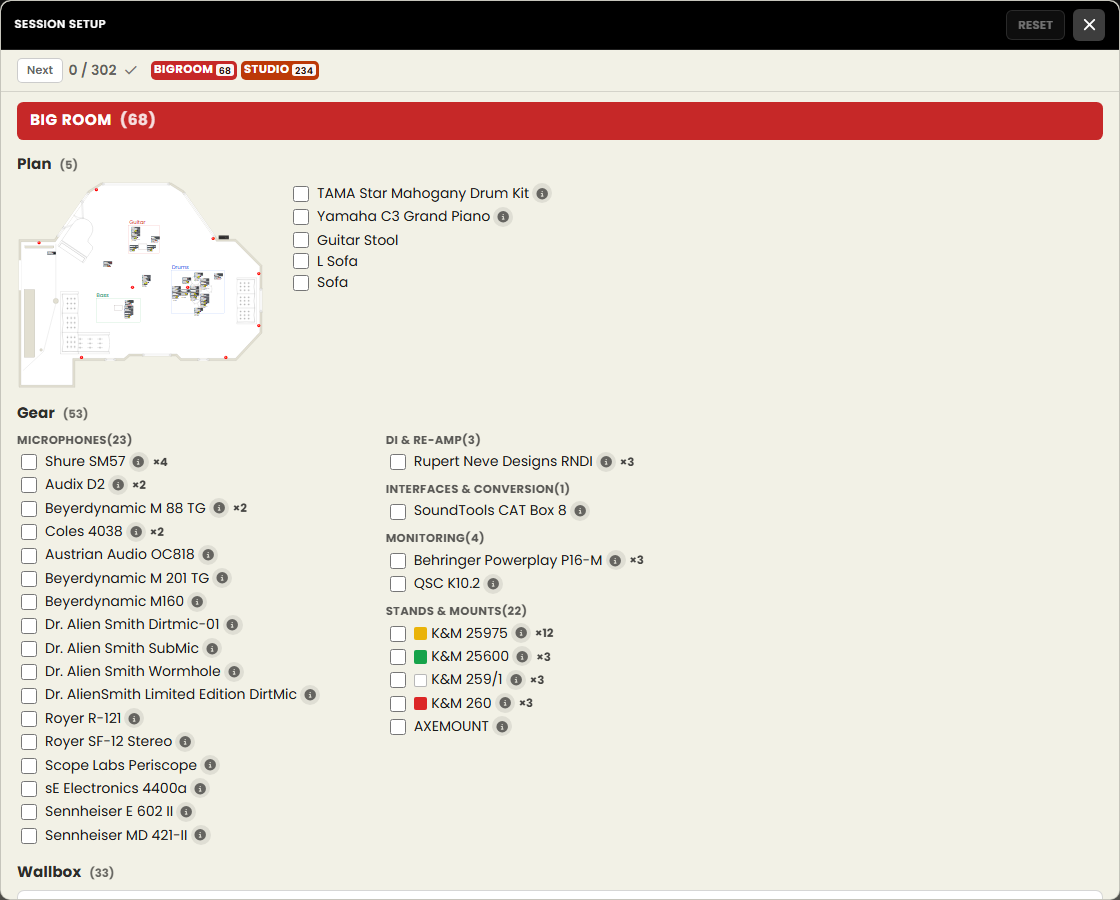
Session Setup turns the plan into a checklist for the room. The Big Room part runs through To Move, Plan, Gear, Wallbox and Cables. The Studio part covers Patch cables, To Move, CAT Patchbay, SSL Origin Console, Patchbay, Phantom power, Patch list and Notes. Phantom power lists exactly which preamp channels need 48V, worked out from the mics in the plan.
Items are ticked off as they are done, the list can be filtered to the Big Room or the Studio, and the ticks are kept per session on that computer so you can pick up where you left off. In the studio the checklist can be printed and opened on a phone from a QR code; on this site the QR code is available for the demo sessions. An assistant can work from it while you attend to the session - the engineer remains responsible for checking the setup. Open the checklist for the band demo.
Try it in the tourTour: Plan the physical session
Saving, exporting and sharing
A session plan can be renamed, duplicated, exported and deleted from one library. It carries its own title, picture and description so a library of sessions stays recognisable.
Plans live on the computer you made them on. To move one to another, or to send it to us before a session, export the session file; we can open it here, and any session file someone sends you can be imported the same way. A plan can also be exported as a picture.
Try it in the tourTour: Save your session
The Tour
Each tour chapter sets up a practice plan, highlights where to click and waits for you to do the step before it moves on, so the controls are learned on real cards rather than read about here. It can be started from the entry panel, picked up again where you left it, and replayed any time.
Each link below opens the tour at that chapter:
- Essentials: Getting started
- Essentials: Reading a gear card
- Essentials: Cables and the legend
- Essentials: Mouse and view
- Essentials: Save your session
- Deep dive: Align and annotate
- Deep dive: Build faster
- Deep dive: Bring your own gear
- Deep dive: Find and follow the signal
- Deep dive: The wallbox
- Deep dive: The SSL Origin console
- Deep dive: The CAT network
- Deep dive: Plan the physical session
- Deep dive: Capstone challenge
Once you are past the tour, a keyboard and mouse reference inside the tool lists every shortcut and gesture in one place.
Try it in the tourTake the tour from the startStart the deep dive
See it in detail
Open a demo and try it for yourself, read the rest of the engineer guide, or talk to us about the preparation your session needs.